
How Do I Add A Customer Review To My Website Using Canva
Following up from my recent blog post on the importance of customers reviews for florist shops, A great customer review is one of your most powerful marketing assets for your bricks and mortar florist shop. But how do you display it on your website in a way that looks professional and builds trust and helps with your conversion rate? In this guide I thought was important to share with you, I'll show you exactly how to turn a simple text review on any review website into a beautiful, branded image for your website. I will cover what information to include, the best free tools for the job, and a detailed tutorial on how to match the colours perfectly to your own brand.
Some Tools to Help You Create Reviews
Below are some free tools you can use to help create reviews that can sit on your website. For the purpose of simplicity I have only listed two below as, they are, at least in my opinion, the most recognised, and easiest to use. In this post I will focus on Canva, in another post I will focus on ChatGPT.
- Canva: You can me or create images but on the free plan there are some limitations but this is a wonder resource, even the free version, as there are so many awesome templates you can use, and yes, even review ones you can tweak so you can add your review text to them
- ChatGPT: This would be my best advice but ultimately it is up to you, as mentioned I will discuss this in great detail in a future blog post
What to Include in the Review
There are a number of free tools out there you can use to assist you on uploading the review to your website. But when you do, my advice is to always ensure you include all the details of the review, and even the date of the order, SKU number of the product and order reference number, these all build trust with future customers. These should include:
- Name, but only it has been shared publicly
- Date of flower purchase
- What they ordered
- The SKU code of the product
- A link to that product
- Date of purchase
- The review
- Where the flowers were sent to, that is city/state/town/suburb, never include the actual address
How do I match my website colours when making an image review?
I can hear you thinking this as I am typing. It's actually super simple. Let's break it down into step as this is what I personally do to find colours I need. But also, I asked one of my workmates to make a video, it's as professional as we can make it with the resources we have, but it will make what I am trying to explain way easier to understand. I am super camera shy so I asked Andrew to make it :)
- Go to imagecolourpicker.com
- If you are using a desktop or laptop Windows PC then go to your website in a new Google Tab, whilst keep the former open too, go to the place on your website where your branded colours are
- Click on the printscreen button, every keyboard is different, but try looking on the top right area, around your F12 button
- Take the screenshot
- Find the image, usually in your gallery folder, to ensure it's there
- Go back to imagecolourpicker and click on the 'upload your image button'
- A popup will appear, then click browse of drop your image
- Double click on it
- It will then upload
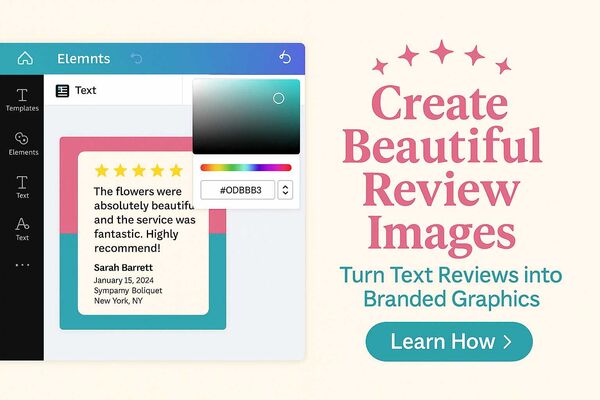
- An odd looking bubble, as per image below within the green area, looking thing will appear that will align with the movements of your mouse, run the bubble (for want of a better word) over your image
- Once you have located the colours you would like to see on your review, down the track and more on that later, click on that part of the image. This will populate your colours into both HEX or RGB colours - let's focus on the hex colours. Make a note of the hex colours, if you need more than one, ensure you make a note each time of the colours as they will change every time you do a new click with your mouse. You can see with the image below that by clicking my mouse on the colour I need to know about then populates the RGB and HEX areas. You can click on the area to the right of the colour codes, that looks like two pieces of paper, to copy thee HEX code rather than trying to remember it

It's that simple, you should now have a bunch of HEX colours which will form the basis of your review image, that now will match your website. Keep these colours on file for use not only for your reviews, but other things around the shop etc.
Now Let's Make the Customer Review
As I have mentioned reviews are essential for any florist shop. They are a trust signal for customers, they can indirectly help with your ranks in Google and other search engines, they can increase your click through rate in Google search but most importantly they can help to increase sales, also known as, conversion rate on visitors to your website. Now, let's move onto how to make them, now that we know our websites colours.
How to Make a Florist Customer Review in Canva
I am going to assume at this point that you have created a free account with Canva and have logged into that account. Also, in my opinion this is the more challenging way, later on in another blog post I will discuss how to create a customer review for your florist shop in ChatGPT which is, at least in my opinion, far, far easier :)
Again, Andrew, makes a short tutorial on YouTube about it below.
Step 1 - log into Canva
At this point you should be logged into your Canva account and at the very top you should see this at the top of your page.

Step 2 - search for 'customer reviews'
In the search field, I want you to click into it and type 'customer reviews'. This will then populate 100's of customer review templates for you to choose from. With a free account you can choose from any customer review template that does not have what looks like a crown in it.

Step 3 - let's find your favourite template for your florist reviews
Once you have found the template that you like for your flower shop customer reviews, click on the template which will pop a new screen showing you the review template you chose, plus a host of other similar templates, which can be very handy for further inspiration.
* Here is a little tip: If there are any others there you like, for other parts of your florist shop, you hover over them and click the 'star' button to save them to your favourites to use down the track.
Click on the purple button which says 'customize this template', which will fire this template into a new tab and you should see something like the below image.

Step 4 - working with background colours
At this point I am assuming you have followed by steps above and have isolated your florist websites' branded colours, that is, the ones we will use in the the review. Whilst not the prettiest colours, for the purpose of this guide, I will be using the HEX codes I showed you above with is a Woolworths green (#caeb6d) and yellow (#ffda00). You can also refer to the video above that is far more comprehensive.
What colour to use in what background, there are three in this example is entirely up to you. When deciding though, just play around with it.
- Use your mouse to hover over the image. Depending on where you scroll will determine what you will be able to change.
- Use the HEX colours to selected and change the panel colours
Step 5 - adding the review details
- Find the review that you want to recreate in Google, Facebook or wherever it came from, copy the text of the review and paste over the exiting demonstration text
- Add all the details about the review, like customer name, order number, product ordered etc.
- In this template example, click on the image of the lady and click the delete button, then delete the remaining image area after that
Step 6 - resize the image
Once you have completed your image edits I highly advise resizing your image. Downloading the flower review image the way it is will mean the image is way too large for your website.
- Click on the 'resize' button at the top of the screen in the menu
- You will be presented with some default image sizes
- Click custom size
- The default size is usually 1080x1080, I want you to click the tiny box next to the default size which should add a tick to the box
- Then click on the padlock so that it's closed as, by default, it's open
- In each of the top boxes only type over the 1080 with 450 and 450. If for some reason the padlock unlocks and, ensure you close it again
- Then click copy and resize
- Then click the design that is 450x450
Step 7 - downloading your customer flower review
- Move your mouse to the top right of your screen
- Click on the share button
- Click on the download button
- Click on the file type button and change it from PNG to JPG
- Click on the 'download' purple button
- Your image is complete and will download automatically
Creating stand out review images is one of the most effective ways to build trust and show new customers that you're a safe pair of hands. Now that you have the technical skills to do it, I'd love to hear from you. What's the biggest challenge you face when it comes to customer reviews? Let me know in the comments below!
For more florist shop related articles click here.
Blog Categories
Recent posts
- How Australian Florists Can Bloom Year Round
- From Lime Green Walls to the iPhone 16: My 17-Year Journey in Florist Photography
- How Do I Add A Customer Review To My Website Using Canva
- When Customers Ask Their Phone for Flowers: Are You the Answer?
- Google Mixboard for Florists: How to Fix the "Client Language Gap" in Consultations
- What is Google Pomelli? The AI Assistant Every Florist Needs
